The following is reprinted from CMM Quarterly Publications Zeiss Calypso Mini-Books, Calypso Plan Menu
It is possible, and sometimes necessary, to measure a feature with multiple probes. Calypso will automatically define the probe travel path by inserting the clearance planes it needs to navigate around the part.
In this example we will measure a cylinder from both ends, one circle on each end of the cylinder. This will require two different probes.
CAD Model
(No CAD Model is shown below)
If you are using a CAD model then extract the cylinder.
Click on Strategy to make adjustments on the circle paths.
Verify that the clearance plane in the Clearance Group is correct.
Double click on Circle Path1. Make sure the Stylus number is correct. This will be the first circle measured so it should match the clearance group direction.
In other words, our clearance group is –Y. This is the direction the probe is going to move along to enter our feature to probe the first diameter. Make sure the Stylus entry is correct in order to accomplish this.
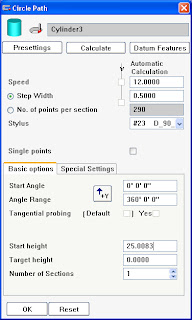
Double click on Circle Path2. Make sure the Stylus number is correct. This will be the stylus that will measure the second circle of our cylinder. This stylus must be able to enter the other side of the cylinder.
Now click on OK to exist Strategy and OK to close the feature dialog box.
This dialog will appear
This looks more ominous than it actually is. What it is actually stating is that Calypso recognizes that there are more than one stylus used to check this feature and it may require additional navigational clearance planes in order to complete the task.
YES – Calypso will add the additional clearance planes to define the proper path. Calypso does an excellent job in this respect and while you should run it through slow the first time Calypso generally gets is right.
NO – You understand that additional navigation is needed but you take the responsibility to add the position points, or clearance planes needed. You have defined the path and you do not want Calypso to change this.
No CAD Model
This is handled the same as with a CAD model, however; if no CAD model exists then measure the cylinder, changing the stylus orientation between the circles. Do not worry about clearance planes just yet. When you accept the feature you will be prompted with this message.
The procedure is identical to what is shown above.


 Create a Curve Form Characteristic by clicking on Form and Location/ Curve Form. Open the Curve Form and select the curve as the Feature.